Campaign Management Features
Managing Your Campaign Settings and Features
This article provides a comprehensive guide on managing your campaign settings and functionalities, including privacy controls, activation, deactivation, deletion, saving changes, and other essential features to help you efficiently customize your campaign's behavior and accessibility.
Features and Their Functions
1. Edit Campaign Name (Pen Icon)

Purpose: Allows users to rename a campaign.
How to Use:
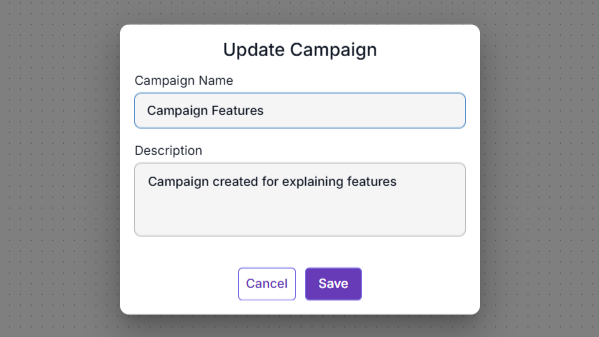
Click on the Pen Icon next to the campaign name.
Enter the new campaign name and description in the pop-up.
Save the changes to apply the updated name.
2. Privacy Settings (Lock Icon)
Purpose: Enables users to toggle between private and public campaign settings.
Behavior:
Public Campaign: Accessible to all users within the organization, allowing viewing and editing.
Private Campaign: Visible only to the campaign creator; other users cannot view or edit it.
How to Use:
Click the Lock Icon to toggle between private and public.
3. Exit Campaign (Exit Button)
Purpose: Exits the campaign and redirects the user to the campaign list view.
How to Use:
Click the Exit Button.
4. Save Changes (Save Button)
Purpose: Saves all modifications made to the campaign.
How to Use:
Click the Save Button after making changes.
Verify that the changes are reflected in the campaign overview.
5. Delete Campaign (Delete Button)
Purpose: Permanently removes the campaign.
How to Use:
Click the Delete Button.
Confirm deletion in the pop-up prompt.
Once deleted, the campaign cannot be recovered.
6. Activate Campaign (Activate Button)
Purpose: Starts the campaign, initiating contact flow through defined steps.
Behavior:
Validates campaign configuration before activation.
Replaces the "Activate" button with a "Deactivate" button upon activation. How to Use:
Click the Activate Button.
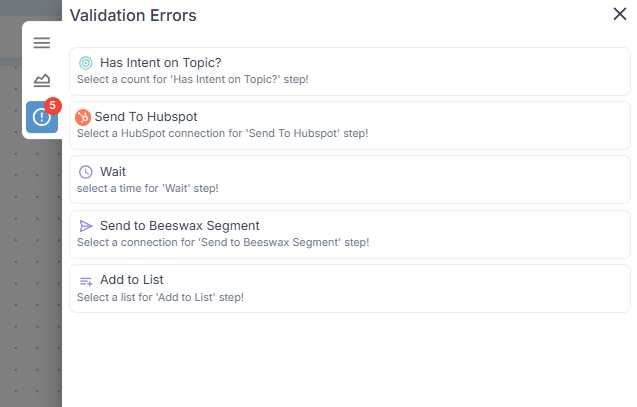
Resolve any validation errors, if prompted.
The campaign status updates to "Active."
Click the Deactivate Button to stop the campaign
7. Campaign Status
Purpose: Displays the campaign's current state.
Status Types:
Draft: Not yet activated (yellow background).
Active: Running campaign (green background).
Inactive: Deactivated campaign (yellow background). How to Use:
Check the campaign interface to view the status.
8. Campaign Info (Burger Icon)
Purpose: View and edit the campaign name and description and enable contact reflow.
How to Use:
Click the Burger Icon to open campaign details.
Click the Pen Icon to edit the name and description.
Use the toggle button under "Allow reflow of contacts" to enable or disable the feature, to flow the same contacts again in the same campaign.
9. Operational Report
Purpose: Access reports detailing contact entry and exit data.
How to Use:
a. Campaign Entry Report -
Select the Campaign Entry Report to view details about contacts that have entered campaigns, including the feeder step they originated from.
Use the date filter to refine the contact list.
Click the "Export" button to download a CSV file of the contact data.
b. Campaign Exit Report -
Select the Campaign Exit Report to view information about contacts that have successfully completed the campaign steps.
Apply the date filter to narrow down the contact list.
Click the "Export" button to download a CSV file of the contact data.
10. Validation Errors

Purpose: Identify and review missing or incorrect configurations in campaign steps.
How to Use:
Click the error icon to view all validation errors related to steps with missing or incomplete configurations.
11. Zoom In (+ Button)
Purpose: Provides a closer view of the campaign.
12. Zoom Out (- Button)
Purpose: Expands the view for a broader perspective.
13. Fit View (Recenter Button)
Purpose: Adjusts the campaign canvas to fit within the view.
14. Toggle Interactivity (Lock Button)
Purpose: Locks campaign flow steps, preventing modifications or movement.
Notes
Deleted campaigns cannot be recovered—use the Delete Button with caution.
Privacy settings impact visibility—switching between private and public affects accessibility for other users.
Related Articles
Managing Campaign Contacts: Tracking, Reflow, and Validation
Tracking Entry and Exit Reports in Campaigns Entry Report When contacts enter a campaign through any feeder step, they are recorded in the Entry Report. This report provides key details such as: Contact details Entry date and time Step name from ...